Friday, August 18, 2023

How to Fix a Refrigerator Ice Maker That’s Not Working

Introduction:

The convenience of having a refrigerator with an integrated ice maker is undeniable, offering a steady supply of ice to keep our drinks refreshingly chilled. However, there are times when this modern marvel can encounter a frustrating hiccup: the ice maker suddenly refuses to cooperate. In this article, we delve into the intricate world of refrigerator ice makers, exploring the various components that collaborate to produce those ice-cold cubes and addressing the potential culprits behind their sudden malfunction.

Anatomy of an Ice Maker:

Before we dive into troubleshooting, it’s important to understand the anatomy of an ice maker. This ingenious appliance consists of several key components that work harmoniously to create the ice we often take for granted. At the heart of the system is the water supply valve, responsible for delivering water to the ice maker. Connected to the valve is the water line, which facilitates the flow of water into the ice maker’s reservoir. Within the ice maker, the thermostat plays a crucial role by monitoring the temperature, ensuring that the freezing process occurs at the optimal conditions. The motor and gearbox then work together to initiate the ice release, pushing the ice cubes out of their molds and into the storage bin. Finally, a sensor detects when the bin is full, signaling the ice maker to pause production until ice is removed.

Common Culprits Behind a Non-Functioning Ice Maker:

  1. Water Supply Issues: Often, a malfunctioning ice maker can be traced back to water supply problems. A clogged or frozen water line can impede the flow of water into the ice maker, leading to inadequate ice production or none at all.
  2. Faulty Water Inlet Valve: The water inlet valve controls the flow of water into the ice maker. If this valve is defective, it can disrupt the water supply and prevent the ice maker from producing ice.
  3. Temperature Troubles: The thermostat is responsible for maintaining the right temperature for ice formation. If it becomes faulty, it may not signal the freezing process to begin, causing a lack of ice production.
  4. Motor and Gearbox Glitches: A malfunctioning motor or gearbox can hinder the ice release mechanism. This can result in ice cubes getting stuck in the molds or failing to be dispensed into the storage bin.
  5. Sensor Snags: The bin sensor plays a vital role in detecting when the ice bin is full. If this sensor is malfunctioning, it might mistakenly signal the ice maker to stop producing ice even when the bin is empty.
  6. Frozen Fill Tube: The fill tube, through which water enters the ice maker, can sometimes freeze due to improper temperatures or a malfunctioning thermostat, preventing water from reaching the ice maker.

Symptoms of a Malfunctioning Ice Maker:

An ice maker, like any intricate system, can exhibit a range of symptoms when something goes awry. Recognizing these telltale signs can help pinpoint the issue and guide you toward effective troubleshooting. Here are some common symptoms of a malfunctioning ice maker:

  1. The Ice Maker Is Not Making Any Ice: One of the most obvious signs of trouble is the absence of ice production. If your ice maker is not producing any ice at all, it could be indicative of several problems. Check the water supply line and the water inlet valve to ensure water is reaching the ice maker. Additionally, assess the temperature settings, as a thermostat malfunction might prevent the freezing process from initiating.
  2. The Ice Maker Is Making Small or Irregular Ice Cubes: If your ice maker is churning out unusually small or misshapen ice cubes, it suggests an issue with the freezing process. Inconsistent temperatures, a faulty thermostat, or mineral buildup in the water line could be causing this irregular ice production.
  3. The Ice Maker Is Making Cloudy or Discolored Ice: Cloudy or discolored ice can be unappetizing and indicative of impurities in the water supply. Mineral deposits, such as calcium and magnesium, can accumulate over time and find their way into the ice cubes. Regularly changing your water filter and flushing the system can help mitigate this problem.
  4. The Ice Maker Is Leaking Water: Discovering pools of water beneath or around your ice maker is a cause for concern. Leaks could be attributed to a variety of issues, including a cracked water line, a faulty water inlet valve, or improper installation. Addressing leaks promptly can prevent water damage and further complications.
  5. The Ice Maker Is Making a Loud Noise: Unusual noises emanating from your ice maker can be unsettling. Grinding, squealing, or rattling sounds might indicate problems with the motor, gearbox, or other moving parts. A thorough inspection and potential lubrication or replacement of worn components might be necessary.

Identifying these symptoms is the first step toward resolving ice maker issues. In the following sections, we will delve into each symptom in greater detail, offering step-by-step guidance to diagnose the root cause and implement effective solutions. By understanding the manifestations of a malfunctioning ice maker, you’ll be better equipped to restore it to its efficient, ice-producing glory.

How to Troubleshoot a Malfunctioning Ice Maker:

Encountering a malfunctioning ice maker can be a frustrating experience, but fear not – many issues can be resolved through systematic troubleshooting. By following these steps, you can diagnose and potentially fix the problem, ensuring a steady supply of ice for your beverages and chilled treats:

  1. Check the Water Supply to the Ice Maker: Ensure that the water supply to the ice maker is not obstructed or disconnected. Examine the water supply line for kinks, twists, or leaks. If the water supply appears intact, move on to the next step.
  2. Check the Water Filter: A clogged or expired water filter can hinder water flow and lead to poor ice production. Consult your refrigerator’s manual to locate and replace the water filter, typically found in the interior of the fridge. Regularly changing the filter can prevent impurities from affecting ice quality.
  3. Clean the Ice Maker: Over time, mineral deposits and debris can accumulate within the ice maker, impeding its performance. Gently remove the ice maker unit according to the manufacturer’s instructions. Thoroughly clean the ice maker, including the ice mold, using a mixture of mild soap and warm water. Rinse well and allow it to dry before reinstalling.
  4. Defrost the Ice Maker: If you notice ice buildup within the ice maker or the ice mold, it might be necessary to defrost the unit. Turn off the ice maker and unplug the refrigerator. Allow the ice to melt naturally or use a hairdryer on a low setting to expedite the process. Once the ice has melted, plug the refrigerator back in and turn the ice maker on.
  5. Reset the Ice Maker: Some ice makers have a reset button or switch that can help restore proper functioning. Consult your refrigerator’s manual to locate and follow the reset procedure. This step can often resolve minor glitches and restore normal ice production.
  6. Replace Ice Maker Parts: If all else fails, and the issue persists, it might be necessary to replace specific ice maker components. Faulty parts like the water inlet valve, thermostat, motor, or sensor could be the root cause of the problem. Consult a professional technician or refer to your refrigerator’s manual for guidance on replacing these parts.

Remember, safety first! Always disconnect the refrigerator from power before performing any troubleshooting or maintenance procedures. If you’re uncomfortable performing any of the above steps, consider seeking assistance from a qualified appliance repair technician.

By methodically working through these troubleshooting steps, you can often identify and address the underlying issue affecting your malfunctioning ice maker. Restoring your ice maker to proper working order can bring back the convenience and enjoyment of having a steady supply of ice at your fingertips.

Additional Tips for Troubleshooting a Malfunctioning Ice Maker:

In your quest to restore your ice maker’s functionality, considering these additional tips can help you navigate through the troubleshooting process with greater ease and effectiveness:

  1. Make Sure the Ice Maker Is Turned On: It might seem obvious, but sometimes the simplest solutions are the most easily overlooked. Ensure that the ice maker is actually turned on and activated. A switch or button near the ice maker’s control panel typically controls its operation. If the ice maker is off, turning it on could quickly resolve the issue.
  2. Check the Ice Maker’s Settings: Modern refrigerators often feature customizable settings for the ice maker. Verify that the settings are configured correctly based on your preferences. These settings might include ice cube size, ice production rate, or even a vacation mode that could impact ice maker operation.
  3. Make Sure the Ice Maker Is Not Overloaded: While ice makers are designed to provide a steady supply of ice, overloading the storage bin can impede proper operation. Excessive ice buildup might interfere with the ice release mechanism or trigger the bin’s full sensor prematurely. Regularly empty the ice bin to prevent such issues.
  4. Utilize the Refrigerator’s Diagnostic Mode (for Newer Models): Some modern refrigerators come equipped with diagnostic modes that can assist in identifying issues with the ice maker. Refer to your refrigerator’s manual for instructions on accessing and utilizing this mode. Diagnostic codes or error messages provided by the refrigerator’s display can offer valuable insights into the problem.
  5. Seek Professional Help When Needed: If you’ve diligently followed all the troubleshooting steps and your ice maker remains non-functional, it’s time to seek the expertise of a qualified refrigerator repair technician. Attempting to diagnose or repair complex issues without proper training could lead to further complications. A professional technician can accurately diagnose the problem and implement the necessary repairs.

Remember that each refrigerator model may have unique features and nuances, so consulting your appliance’s user manual is crucial for accurate troubleshooting. While addressing a malfunctioning ice maker can be a DIY endeavor in many cases, there’s no shame in seeking professional help when the situation calls for it. With the right approach, you’ll soon be enjoying a consistent supply of ice once again.

When to call a professional

  • If you have tried all of the troubleshooting steps and the ice maker is still not working.
  • If you are not comfortable troubleshooting the ice maker yourself.

Knowing when to call a professional for assistance is crucial to prevent further complications and ensure the proper functioning of your ice maker and refrigerator. Here are specific situations that warrant seeking the expertise of a qualified refrigerator repair technician:

  1. Persistent Malfunction After Troubleshooting: If you’ve diligently followed all the recommended troubleshooting steps, including checking the water supply, cleaning, defrosting, and assessing settings, but your ice maker remains non-functional or continues to produce subpar ice, it’s time to bring in a professional. Persistent issues could indicate underlying problems that require specialized knowledge and tools to diagnose and address.
  2. Lack of Comfort or Experience: If you feel unsure or uncomfortable about performing the troubleshooting steps yourself, it’s best to leave the task to a trained technician. Refrigerators and ice makers are complex appliances, and attempting repairs without proper knowledge could lead to further damage or safety hazards.
  3. Potential Electrical or Mechanical Risks: Refrigerators and ice makers involve electrical components and mechanisms that require careful handling. If you’re not well-versed in working with electrical systems or intricate mechanical parts, it’s safer to rely on a professional who understands the potential risks and can handle the repairs safely.
  4. Newer Refrigerator Models or Advanced Features: If you have a newer refrigerator model with advanced features, diagnostic modes, or integrated smart technology, it’s advisable to consult a professional. These advanced systems may require specialized expertise to diagnose and repair, ensuring that your appliance’s functions are fully restored.
  5. Warranty Considerations: Attempting DIY repairs on your ice maker could potentially void any existing warranties on your refrigerator. Many manufacturers require that repairs be performed by authorized technicians to maintain warranty coverage. Before attempting any repairs yourself, review your refrigerator’s warranty terms and conditions.
  6. Time and Convenience: Repairing a malfunctioning ice maker can be time-consuming, especially if you’re not familiar with the process. Calling a professional technician can save you time, effort, and frustration, allowing you to quickly get back to enjoying the benefits of your fully functional ice maker.

Remember that the primary goal is to ensure the safety, efficiency, and longevity of your refrigerator and its components. A qualified refrigerator repair technician has the knowledge and experience to diagnose and resolve issues effectively, helping you avoid unnecessary expenses and potential hazards. When in doubt, it’s better to err on the side of caution and seek professional assistance for your ice maker troubles.

Conclusion:

In the world of modern conveniences, a malfunctioning ice maker can be a minor inconvenience with major implications for your daily routine. In this article, we explored the intricate workings of a refrigerator ice maker, delving into its various components and the collaborative efforts that lead to the creation of ice cubes. We also examined common symptoms of a malfunctioning ice maker and provided a comprehensive guide to troubleshooting and resolving these issues.

Key Points:

  1. Anatomy of an Ice Maker: We dissected the ice maker’s key components, from the water supply valve and water line to the thermostat, motor, gearbox, and sensor, highlighting their vital roles in the ice-making process.
  2. Symptoms of Malfunction: We identified several symptoms of a malfunctioning ice maker, including no ice production, irregular ice cubes, cloudy or discolored ice, leaks, and unusual noises.
  3. Troubleshooting Steps: We offered a step-by-step approach to troubleshoot ice maker issues, covering checking the water supply and filter, cleaning and defrosting the ice maker, resetting settings, and replacing parts when necessary.
  4. Calling a Professional: We emphasized the situations in which seeking the help of a qualified refrigerator repair technician is essential, such as persistent issues after troubleshooting or personal discomfort with DIY repairs.

Preventing Ice Maker Problems:

Prevention is key to ensuring a smoothly operating ice maker. Here are some tips to keep your ice maker running efficiently and to mitigate potential problems:

  1. Regular Cleaning: Routinely clean your ice maker, including the ice mold and storage bin, to prevent mineral buildup and mold growth. Use a mixture of mild soap and warm water, and be sure to rinse thoroughly.
  2. Change the Water Filter: Stay on top of water filter replacements according to the manufacturer’s recommendations. This helps maintain water quality and prevent mineral deposits from affecting ice quality.
  3. Avoid Overloading: Refrain from overloading the ice storage bin, as excess ice can impede the release mechanism and trigger the bin’s full sensor prematurely.
  4. Mindful Use: Be mindful of how frequently you open the refrigerator door, as this can affect the internal temperature and ice production. Avoid leaving the door open for extended periods.
  5. Regular Inspections: Periodically check for leaks, unusual noises, and other signs of ice maker issues. Catching and addressing problems early can prevent more significant complications down the line.
  6. Professional Maintenance: Consider scheduling regular professional maintenance for your refrigerator and ice maker, especially if you have a newer model with advanced features. This can help catch potential issues before they escalate.

By understanding the inner workings of your ice maker, recognizing common symptoms of malfunction, and knowing how to troubleshoot and prevent problems, you’re equipped to maintain a consistent supply of ice and enjoy the convenience your refrigerator brings to your daily life.

The post How to Fix a Refrigerator Ice Maker That’s Not Working first appeared on Appliance Repair Fort Lauderdale.

from Appliance Experts https://www.appliancerepairfortlauderdalefl.net/how-to-fix-a-refrigerator-ice-maker-thats-not-working/
via The Appliance Experts

Tuesday, May 30, 2023

Fixing Dryer Heating Element Failure For Clothes Dryer Not Heating And Gas Dryer Not Drying Clothes

A dryer heating element is a critical component of your dryer. It is responsible for heating the air that circulates around your clothes, helping them to dry. If the heating element fails, your dryer will not be able to heat the air, and your clothes will not dry.

A dryer heating element is typically made of a metal coil that is wrapped in an insulating material. When electricity is applied to the coil, it heats up and circulates heat throughout the dryer.

The dryer heating element is located in the back of the dryer, behind the lint screen. To access the heating element, you will need to remove the back panel of the dryer.

Understanding the Importance of a Functioning Dryer Heating Element

A functioning dryer heating element is essential for the proper operation of your dryer. Without a functioning heating element, your dryer will not be able to heat the air that circulates around your clothes, and your clothes will not dry.

This can lead to a number of problems, including:

  • Clothes that are not dry after a full cycle
  • Clothes that are damp and musty
  • Clothes that are wrinkled and difficult to iron
  • Clothes that are damaged by mildew or mold

In addition to these problems, a malfunctioning dryer heating element can also be a fire hazard. If the heating element overheats, it can cause a fire.

If you suspect that your dryer heating element is not working properly, you should have it repaired or replaced as soon as possible.

Common Causes of Dryer Heating Element Failure

There are a number of common causes of dryer heating element failure. Some of the most common causes include:

  • Overloading the dryer:Overloading the dryer can put too much stress on the heating element, which can lead to premature failure.
  • Not cleaning the lint screen regularly:The lint screen helps to protect the heating element from lint buildup. If the lint screen is not cleaned regularly, the lint can build up and cause the heating element to overheat and fail.
  • Poor ventilation:Poor ventilation can also cause the heating element to overheat and fail. Make sure that the vent hose is clear of obstructions and that the dryer is properly vented to the outside.
  • Damage from a power surge:A power surge can damage the heating element, causing it to fail.
  • Natural wear and tear:Over time, the heating element will wear out and need to be replaced.

Step-by-Step Guide to Diagnose Dryer Heating Element Issues

If you suspect that your dryer heating element is not working properly, there are a few simple steps you can take to diagnose the problem:

  1. Unplug the dryer and allow it to cool completely.
  2. Remove the back panel of the dryer.
  3. Locate the heating element.
  4. Inspect the heating element for any signs of damage, such as cracks, burns, or breaks.
  5. If the heating element is damaged, it will need to be replaced.

To test the heating element, you can use a multimeter. Set the multimeter to the continuity setting and touch the probes to the terminals of the heating element. If the multimeter beeps, the heating element is working properly. If the multimeter does not beep, the heating element is damaged and needs to be replaced.

Once you have diagnosed the problem, you can either repair the dryer yourself or hire a qualified technician to do it for you. If you choose to repair the dryer yourself, be sure to follow the instructions that come with the replacement heating element.

Tools and Materials Needed for Repairing a Faulty Dryer Heating Element

To repair a faulty dryer heating element, you will need the following tools and materials:

  • Screwdriver:A standard screwdriver will be needed to remove the back panel of the dryer and access the heating element.
  • Multimeter:A multimeter is a tool that can be used to test the continuity of electrical circuits. This can be used to test the heating element to see if it is working properly.
  • Replacement heating element:You will need to purchase a new heating element that is compatible with your dryer model.
  • Safety glasses:Safety glasses should be worn to protect your eyes from any flying debris.
  • Gloves:Gloves should be worn to protect your hands from any heat or sharp objects.

Replacing the Heating Element: A Detailed Repair Process

Once you have gathered the necessary tools and materials, you can begin the process of replacing the heating element.

  1. Unplug the dryer and allow it to cool completely.
  2. Remove the back panel of the dryer.
  3. Locate the heating element.
  4. Disconnect the wiring from the old heating element.
  5. Remove the old heating element.
  6. Install the new heating element.
  7. Connect the wiring to the new heating element.
  8. Replace the back panel of the dryer.
  9. Plug in the dryer and test it to make sure that it is working properly.

Troubleshooting Tips for Non-Heating Clothes Dryers and Gas Dryers

Non-Heating Clothes Dryers

  • Check the lint screen.The lint screen is located in the front of the dryer and helps to prevent lint from building up and causing the dryer to overheat. If the lint screen is clogged, it will prevent the dryer from heating properly.
  • Check the vent hose.The vent hose is located on the back of the dryer and helps to remove hot air from the dryer. If the vent hose is clogged, it will prevent the dryer from heating properly.
  • Check the thermostat.The thermostat controls the temperature of the dryer. If the thermostat is faulty, it will prevent the dryer from heating properly.
  • Check the heating element.The heating element is responsible for heating the air in the dryer. If the heating element is faulty, it will prevent the dryer from heating properly.

Gas Dryers

  • Check the gas supply.Make sure that the gas supply to the dryer is turned on.
  • Check the pilot light.The pilot light is a small flame that ignites the gas in the dryer. If the pilot light is not lit, it will prevent the dryer from working.
  • Check the thermocouple.The thermocouple is a safety device that prevents the gas from flowing to the dryer if the pilot light is not lit. If the thermocouple is faulty, it will prevent the dryer from working.
  • Check the igniter.The igniter is a device that ignites the pilot light. If the igniter is faulty, it will prevent the dryer from working.

If you have checked all of these things and your dryer is still not heating, you may need to call a professional for help.

Preventive Maintenance to Extend the Lifespan of Your Dryer Heating Element

There are a few things you can do to help extend the lifespan of your dryer heating element.

  • Clean the lint screen after every use.The lint screen is located in the front of the dryer and helps to prevent lint from building up and causing the dryer to overheat. If the lint screen is clogged, it will prevent the dryer from heating properly and can also cause a fire.
  • Check the vent hose regularly for obstructions.The vent hose is located on the back of the dryer and helps to remove hot air from the dryer. If the vent hose is clogged, it will prevent the dryer from heating properly and can also cause a fire.
  • Have your dryer serviced by a qualified technician every year.A qualified technician can inspect your dryer for any problems and make repairs as needed. This will help to extend the lifespan of your dryer and prevent costly repairs down the road.

Here are some additional tips for preventing dryer fires:

  • Never overload the dryer.Overloading the dryer can put too much stress on the heating element and can lead to a fire.
  • Use the correct cycle for the type of load you are drying.Using the wrong cycle can cause the dryer to overheat and can lead to a fire.
  • Remove lint from clothes before drying.Lint can build up on clothes and can cause the dryer to overheat and can lead to a fire.
  • Keep the dryer area clean and free of clutter.Clutter can block the dryer vents and can cause the dryer to overheat and can lead to a fire.

By following these tips, you can help to extend the lifespan of your dryer heating element and prevent dryer fires.

Exploring Alternative Solutions for Dryers Not Heating or Drying Clothes

If you are unable to repair your dryer heating element, there are a few alternative solutions you can explore.

  • Purchase a new dryer.If your dryer is old and has other problems, it may be time to purchase a new one. When purchasing a new dryer, be sure to choose one that is energy-efficient and has a good warranty.
  • Hire a professional to repair your dryer.If you are not comfortable repairing your dryer yourself, you can hire a professional to do it for you. A qualified technician will be able to diagnose the problem and repair it quickly and safely.
  • Take your dryer to a laundromat.If your dryer is not repairable, you can take it to a laundromat. This is a temporary solution, but it can be helpful if you need to dry your clothes.

Here are some factors to consider when choosing an alternative solution:

  • Cost:The cost of a new dryer, professional repair, or laundromat service will vary depending on the make and model of your dryer, the severity of the problem, and the location of the repair shop or laundromat.
  • Convenience:A new dryer is the most convenient option, but it can be the most expensive. Professional repair can be less expensive than a new dryer, but it may take longer to complete. Laundromat service is the least expensive option, but it can be inconvenient if you have a lot of laundry to do.
  • Warranty:A new dryer will come with a warranty, which can protect you from future repairs. Professional repair may or may not come with a warranty, so be sure to ask the technician. Laundromat service typically does not come with a warranty.

By considering these factors, you can choose the alternative solution that is best for you.

Safety Precautions When Handling Dryer Heating Element Repairs

When handling dryer heating element repairs, it is important to take the following safety precautions:

  • Unplug the dryer before you begin any repairs.This will prevent you from being shocked by the electrical current.
  • Allow the dryer to cool completely before you touch it.The heating element will be hot and can cause burns.
  • Wear safety glasses and gloves when handling the heating element.This will protect your eyes and hands from any sparks or hot metal.
  • Do not use a damaged heating element.A damaged heating element can cause a fire.
  • If you are not comfortable repairing your dryer heating element yourself, you should seek professional help.A qualified technician will be able to diagnose the problem and repair it quickly and safely.

When to Seek Professional Help for Dryer Heating Element Issues

  • You are not comfortable repairing your dryer yourself.If you are not comfortable working with electrical components, you should not attempt to repair your dryer heating element yourself. A qualified technician will be able to diagnose the problem and repair it quickly and safely.
  • The problem is beyond your skill level.If you have tried to repair your dryer heating element yourself and you have not been able to fix the problem, you should seek professional help. A qualified technician will be able to diagnose the problem and repair it quickly and safely.
  • The problem is dangerous.If you have noticed any of the following signs, you should seek professional help immediately:
    • The dryer is not heating up at all.
    • The dryer is smoking or burning.
    • The dryer is making strange noises.
    • The dryer is leaking water.

By seeking professional help for dryer heating element issues, you can help to prevent further damage to your dryer and prevent a fire.

Here are some tips for finding a qualified technician to repair your dryer heating element:

  • Ask your friends, family, or neighbors for recommendations.
  • Check with your local appliance repair shop.
  • Look for a technician who is certified by a reputable organization, such as the National Appliance Servicenters Association (NASA).

When you are interviewing technicians, be sure to ask about their experience, their rates, and their warranty. You should also be sure to get everything in writing, including the technician’s name, contact information, and the scope of work.

By following these tips, you can find a qualified technician to repair your dryer heating element quickly and safely.

Conclusion

A functioning dryer heating element is essential for the proper operation of your dryer. If the heating element fails, your dryer will not be able to heat the air that circulates around your clothes, and your clothes will not dry. If you suspect that your dryer heating element is not working properly, you should follow the steps in this article to diagnose and repair the problem.

If you are not comfortable repairing your dryer heating element yourself, you should seek professional help. A qualified technician will be able to diagnose the problem and repair it quickly and safely.

By following the tips in this article, you can help to ensure that your dryer heating element lasts for many years to come.

These are the primary cities in Broward County where our exceptionally skilled service technicians provide their services:

Lauderhill, North Lauderdale, Fort Lauderdale, Parkland, Hallandale, Hollywood, Pompano Beach, Oakland Park, Pembroke Pines, Miramar, Plantation, Margate, Lighthouse Point, Coral Springs, Cooper City, Deerfield Beach, Dania, Lauderdale Lakes, Tamarac, Sunrise, Davie, Weston, Coconut Creek

The post Fixing Dryer Heating Element Failure For Clothes Dryer Not Heating And Gas Dryer Not Drying Clothes first appeared on Appliance Repair Fort Lauderdale.

from Appliance Experts https://www.appliancerepairfortlauderdalefl.net/fixing-dryer-heating-element-failure-for-clothes-dryer-not-heating-and-gas-dryer-not-drying-clothes/
via The Appliance Experts

Thursday, January 12, 2023

How To Know If The Clutch On A Top-Loading Washing Machine Is Broken

How to Detect a Broken Clutch in a Top-Loading Washing Machine


A top-loading washing machine is a crucial household appliance, but a malfunction can disrupt your routine. One common issue is a broken clutch, which controls the movement of the internal tub and agitator during the wash cycle. Similar to a manual car transmission, regular use can cause wear and damage to the clutch. To fix this, it’s best to seek assistance from a professional washer repair technician with the experience and tools needed to diagnose and replace the faulty component. Alternatively, you can also check for signs of a broken clutch by observing the machine’s actions.

Step 1: Begin the washing cycle on the machine without adding any clothes.

Step 2: Observe the machine’s filling process. Wait until the tub is completely filled.

Step 3: Listen for the sound of the agitator during the wash cycle. If there is no movement noise, it may indicate a broken or damaged clutch.

Step 4: Let the cycle finish. After the water has drained, listen for the sound of the tub spinning rapidly. If the tub does not rotate, it may mean the clutch is broken.

Step 5: Listen for any variations in the spin cycle, such as slowing or changes in the motor humming. These could indicate a broken or worn clutch.

Step 6: If you hear squeaking from the tub during the wash or spin cycle, it’s a sign that there may be an issue with the machine, possibly a broken clutch.

Useful Tips:

Diagnosing clutch issues can be difficult. Minor problems with the clutch may not show visible signs. However, if clothes remain wet after the spin cycle is finished, it could signify an impending clutch failure. This is because the spin cycle may not have enough power to remove all of the water from the clothes.

A Word of Caution:

When checking the machine or troubleshooting, do not hold down the lid switch. It may make it easier to identify the issue, but it can also put you at risk of injury from moving internal parts.

How do I know if my washing machine clutch is broken?

There are a few signs that may indicate a broken washing machine clutch:

  • If the drum of the washing machine does not spin during the wash cycle, the clutch may be broken.
  • If the drum spins but is making a loud grinding noise, the clutch may be worn out.
  • If the drum does not agitate during the wash cycle, the clutch may be broken.
  • If the machine is making a burning smell, the clutch may be overheating.
  • It is best to contact a professional for repair service if you suspect that your washing machine clutch is broken.

How do you test a washer clutch?

To test a washing machine clutch, you will need to perform the following steps:

  1. Unplug the washing machine from the electrical outlet.
  2. Locate the clutch assembly, which is usually located near the base of the washing machine’s transmission.
  3. Use a socket wrench to remove the bolt that holds the clutch assembly in place.
  4. Remove the clutch assembly and inspect it for any visible signs of damage, such as cracked or worn parts.
  5. Rotate the inner drum of the clutch assembly by hand. If it spins freely and smoothly, the clutch is likely functioning properly. If it feels rough or stiff, the clutch may be worn out or damaged.
  6. If the clutch is damaged, it will need to be replaced.

Note: If you are not comfortable or familiar with appliance repair, it is best to contact a professional for repair service. Incorrectly testing or handling the clutch can cause further damage to the appliance or even cause injury.

What is the most common defect of clutch?

The most common defect of a washing machine clutch is wear and tear. Over time, the friction material on the clutch assembly can become worn, reducing its ability to grip and engage the transmission. This can cause the drum to spin poorly or not at all, or cause the machine to make loud grinding noises. Additionally, the clutch spring can lose its tension, resulting in the clutch failing to engage the transmission.

Another common defect is damage to the clutch assembly caused by a foreign object getting into the drum, such as a coin or a small rock, which can cause the clutch to seize or bind. And also rusting or corrosion can also cause damage to the clutch.

It’s important to note that if you suspect your clutch is defective, it is best to contact a professional for repair service as it may cause further damage if not handled correctly.

How do you fix a washing machine clutch?

To fix a washing machine clutch, you will need to replace the clutch assembly. The specific steps to replace the clutch will vary depending on the make and model of your washing machine, but in general, the process will involve the following steps:

  1. Unplug the washing machine from the electrical outlet.
  2. Locate the clutch assembly, which is usually located near the base of the washing machine’s transmission.
  3. Use a socket wrench to remove the bolt that holds the clutch assembly in place.
  4. Remove the clutch assembly and inspect it for any visible signs of damage, such as cracked or worn parts.
  5. Compare the old clutch assembly with a new one to ensure that you have the correct replacement part.
  6. Install the new clutch assembly and tighten the bolt that holds it in place.
  7. Reassemble the washing machine and test it to make sure that the drum spins properly and that the machine is operating smoothly.

If you are not comfortable or familiar with appliance repair, it is best to contact a professional for repair service. Incorrectly handling or installing the clutch can cause further damage to the appliance or even cause injury.

How much does it cost to replace a clutch on a washing machine?

The cost to replace a clutch on a washing machine can vary depending on several factors, such as the make and model of the washing machine, the cost of the replacement clutch, and the cost of labor.

In general, you can expect to pay anywhere from $100 to $300 to replace a clutch on a washing machine. This may include the cost of the replacement clutch, as well as labor costs for the repair.

However, it’s important to note that the cost can be higher or lower depending on the specific washing machine brand and model. Furthermore, if the problem is not just the clutch but also other issues, the cost will be higher. It is best to get a quote from a professional repair service to get a more accurate estimate for the cost of the repair.

Here are the main cities that our highly experienced service techs service in Broward County:

Lauderdale Lakes, Plantation, Cooper City, Fort Lauderdale, Parkland, Hollywood, Margate, Coral Springs, Weston, Miramar, Lighthouse Point, North Lauderdale, Deerfield Beach, Coconut Creek, Sunrise, Dania, Pompano Beach, Pembroke Pines, Davie, Lauderhill, Tamarac, Hallandale, Oakland Park


The post How To Know If The Clutch On A Top-Loading Washing Machine Is Broken first appeared on Appliance Repair Fort Lauderdale.

from Appliance Experts https://www.appliancerepairfortlauderdalefl.net/how-to-know-if-the-clutch-on-a-top-loading-washing-machine-is-broken/
via The Appliance Experts

Wednesday, December 21, 2022

How To Fix Washer That Won’t Drain By Cleaning The Drain Pump Filter

If your washing machine won’t drain, one possible issue could be a clogged drain pump filter. Here’s how you can try to fix it:

  1. Locate the drain pump filter. This is usually located behind a small access panel on the front of the washing machine, or it may be located underneath the machine. Refer to your owner’s manual for the exact location.
  2. Once you have located the drain pump filter, remove it from the machine. You may need to use a small screwdriver or a coin to unlock the filter cover.
  3. Clean out the drain pump filter. Use a small brush or toothbrush to remove any debris or lint that may be blocking the filter. If the filter is severely clogged, you may need to use a pair of pliers to remove the debris.
  4. Rinse the filter thoroughly with water and replace it in the washing machine. Make sure it is securely in place.
  5. Close the access panel and run a test load of laundry to see if the issue has been resolved. If the machine still won’t drain, there may be another issue that needs to be addressed.

It’s always a good idea to refer to your owner’s manual and follow all safety precautions when working on your washing machine. If you are not comfortable performing this task or if it does not resolve the issue, it’s best to contact a professional appliance repair service for further assistance.

How do I know if my washing machine filter is blocked?

There are a few signs that may indicate that your washing machine filter is blocked:

  1. The washing machine won’t drain: If water is not draining from your machine, it could be because the filter is clogged, preventing the water from flowing through.
  2. The washing machine is making unusual noises: A clogged filter can cause the washing machine’s pump to work harder, which may result in unusual noises.
  3. The washing machine is vibrating excessively: A clogged filter can cause an imbalance in the machine, which can result in excessive vibrations during the wash cycle.
  4. The washing machine is not cleaning clothes effectively: If your clothes are not coming out as clean as they should, it could be because the filter is clogged and not allowing the detergent and water to circulate properly.

To check if your washing machine filter is blocked, you will need to locate the filter and remove it from the machine. Use a small brush or toothbrush to clean any debris or lint from the filter. If the filter is severely clogged, you may need to use a pair of pliers to remove the debris. If the filter is clean and the machine is still experiencing issues, there may be another issue that needs to be addressed.

Where is the pump filter trap on a washing machine?

The location of the drain pump filter on a washing machine can vary depending on the make and model of the machine. In general, it is usually located behind a small access panel on the front of the washing machine, or it may be located underneath the machine. Some washing machines have the filter located on the back of the machine, behind a panel near the bottom.

To find the drain pump filter on your washing machine, you will need to refer to the owner’s manual for your specific model. The manual should have a diagram showing the location of the filter and instructions on how to access it.

If you are unable to locate the drain pump filter or if you are not comfortable attempting to access it, it’s best to contact a professional appliance repair service for assistance.

Do top load washers have drain pump filters?

Yes, many top-loading washing machines have drain pump filters. The drain pump filter is a small screen or mesh that is designed to prevent debris and lint from entering the drain pump and clogging the drain hose. It is usually located behind a small access panel on the front of the washing machine, or it may be located underneath the machine.

To find the drain pump filter on a top-loading washing machine, you will need to refer to the owner’s manual for your specific model. The manual should have a diagram showing the location of the filter and instructions on how to access it.

If you are unable to locate the drain pump filter or if you are not comfortable attempting to access it, it’s best to contact a professional appliance repair service for assistance.

How do I clean the pump filter on my top load washer?

To clean the drain pump filter on a top-loading washing machine, follow these steps:

  1. Locate the drain pump filter. This is usually located behind a small access panel on the front of the washing machine, or it may be located underneath the machine. Refer to your owner’s manual for the exact location.
  2. Once you have located the drain pump filter, remove it from the machine. You may need to use a small screwdriver or a coin to unlock the filter cover.
  3. Clean out the drain pump filter. Use a small brush or toothbrush to remove any debris or lint that may be blocking the filter. If the filter is severely clogged, you may need to use a pair of pliers to remove the debris.
  4. Rinse the filter thoroughly with water and replace it in the washing machine. Make sure it is securely in place.
  5. Close the access panel and run a test load of laundry to see if the issue has been resolved. If the machine still won’t drain, there may be another issue that needs to be addressed.

It’s always a good idea to refer to your owner’s manual and follow all safety precautions when working on your washing machine. If you are not comfortable performing this task or if it does not resolve the issue, it’s best to contact a professional appliance repair service for further assistance.

How often do you need to clean a drain pump filter?

The frequency with which you should clean the drain pump filter on your washing machine will depend on a few factors, including the type of detergent you use and the amount of lint and debris that your machine processes. In general, it is a good idea to clean the filter at least once every few months.

If you notice that your washing machine is not draining properly or if it is making unusual noises, it may be a good idea to check and clean the filter sooner. You should also check and clean the filter if you notice that your clothes are not coming out as clean as they should be.

To clean the drain pump filter, you will need to locate the filter and remove it from the machine. Use a small brush or toothbrush to remove any debris or lint that may be blocking the filter. If the filter is severely clogged, you may need to use a pair of pliers to remove the debris. Rinse the filter thoroughly with water and replace it in the washing machine.

It’s always a good idea to refer to your owner’s manual and follow all safety precautions when working on your washing machine. If you are not comfortable performing this task or if it does not resolve the issue, it’s best to contact a professional appliance repair service for further assistance.

Other reasons for washing machine not draining?

There are several other potential reasons why a washing machine may not drain properly:

  1. Clogged drain hose: The drain hose can become clogged with debris or lint, preventing water from flowing through.
  2. Failed drain pump: If the drain pump has failed, it may be unable to pump water out of the machine.
  3. Broken or kinked drain hose: If the drain hose is broken or kinked, it may be preventing water from flowing out of the machine.
  4. Failed water level switch: The water level switch is responsible for controlling the water level in the washing machine. If it has failed, the machine may not be able to drain properly.
  5. Failed control board: The control board is responsible for controlling the various functions of the washing machine. If it has failed, the machine may not be able to drain properly.

If you are experiencing issues with your washing machine not draining properly, it’s best to try to identify the root cause of the problem. If you are unable to do so or if you are not comfortable attempting to diagnose the issue, it’s best to contact a professional appliance repair service for further assistance.

How to resolve washier drain and pump problems


Getting the washer to drain properly is an important function of a washing machine. If your washing machine does not drain, then there are a number of things you can check. There are also a few ways to fix the problem without having to replace the washer.

A common problem is a clogged drain hose. This can interfere with the flow of water in the washer and cause it to stop draining. It is important to clean the hose with hot water and detergent. When cleaning the hose, be careful not to twist it or pinch it. Afterward, the hose must be reattached to the drain pipe.

Another common problem is a broken water level control. A broken water level control may be preventing the pump from working. An electronic fault, or a mechanical failure, can also cause the drain to stop.

A good way to resolve the problem is to remove the washer from its place and check the drain hose. Be sure to unplug the washer and the faucet from the wall before performing this task. You can use a Phillips head screwdriver to loosen the clamp that holds the drain hose.

Depending on the model of your washer, you should have a drain hose that connects to a nearby drain. The hose will carry dirty water out of the house when the unit is draining. However, if the hose is kinked, it can be twisted or pinched, which can prevent the washer from draining.

In addition, a drain hose can be clogged with foreign objects. To clear a clog, you can either flush it out with a solution of detergent and warm water, or squeezing the tube will work.

Performing a manual spin cycle can also help you identify the problem. If you are able to spin the washer, but it doesn’t drain, you will need to check the pump. Using a multimeter, you can check for motor continuity.

Lastly, a worn out belt is another common cause of a washer that doesn’t drain. A worn belt will not be able to drive the pump.

Cleaning the drain pump filter on the washer

If your washing machine isn’t draining well, the first thing you should do is clean the drain pump filter. This small device collects the lint, threads, and other debris from the washer’s drain hose, keeping them out of the pump. Clogged filters can prevent your washing machine from scrubbing clean and leaving your laundry looking nice.

Usually, there are two types of clogs. One is caused by tissue, paperclips, and other foreign objects. The other is caused by an obstructed drain hose. By cleaning the drain pump filter, you’ll be able to restore the flow of water in your washing machine.

To clean the drain pump, you’ll need to remove the drain hose from the washer and then unplug the power from the wall. You should also check the hose for any kinks or other obstructions. After you’ve loosened any kinks, it’s time to disconnect the hose from the washing machine and rinse it with hot water.

Putting a bucket under the connection of the drain hose is a good way to empty it out. Once you’ve emptied it, you can replace the hose with a new one. Depending on your model, you may need to open up the front or back of the washing machine to get to the drain hose.

Another useful tip is to install a coin trap. These devices capture coins and other items that can clog the washer’s drain. Clean the trap with soap and water to ensure that your coins stay secure.

Using a multimeter, you can test your machine’s drainage system for obstructions. This should be done at least once a year.

Other useful tips include setting reminders to clean the drain pump filter, replacing the hose, and unplugging the water supply. These small steps will keep your machine running smoothly. But if your machine doesn’t drain, call a professional for help. Most problems can be fixed by a licensed plumber.

A clogged drain isn’t fun, but it can’t be fixed by simply putting more detergent in the wash. For a quick and easy solution, clean the drain pump filter.

Access the filter

If your washing machine has trouble draining, you may need to access the filter. The filter, which is located in different locations on front-loading and top-loading washers, collects small objects, lint, and threads. These items can get caught up and block the drain pump.

Washing machines have an access panel in the bottom left corner of the front of the washer. You will need to unscrew the lower panel in order to access the filter. This can be a messy process because you will need to clean the inside of the washer.

GE, LG, and Electrolux washers have lid switches. When the lid is closed, it tells the washer to stop the cycle. If the switch is faulty, the machine will not drain. You can test it by running a regular cycle to ensure that it does not fail.

GE, LG, and Electrolux washing machines have a coin trap that is part of the drain pump. It is easy to remove. However, it can be a serious problem if debris gets stuck in it. That’s because it can also prevent the pump from functioning properly.

A clogged drain hose is another reason your washer won’t drain. You can remove the kink or clog from the hose, or you can replace it.

If you don’t know how to access the filter, you might need to call a repair technician. An appliance repair service can help you figure out how to access your filter and get your washer up and running again. Taking care of your filter periodically can help keep your washer running smoothly.

Some front-loading washers have a hose that goes to the drain pipe in the wall. Make sure that you unplug the hose before you remove it. You may need to disconnect the recirculation pump in order to remove the hose.

Top-loading models are more accessible. You can easily access the filter by removing the top panel and filter. Once you have removed the top panel, you will have access to the switch and a shallow bowl under the filter cap.

Using a multimeter, you can test the switch to see if it is working. If the switch is not functioning, the washer will not drain.

Clean the filter and seal

Keeping your washing machine clean and sealing it properly can be essential in maintaining the machine’s performance. There are several ways to do this. Some models are equipped with coin traps and have a self-cleaning filter. These features will help prevent clogging. But even if your washer isn’t equipped with these features, there are still some things you can do to help keep it running smoothly.

If your washing machine isn’t draining, you may want to consider cleaning the filter. Lint and threads can build up on your filter, which can block the machine from draining. You can remove the filter and clean it by turning it counter-clockwise.

Depending on the model, the filter is attached to the washing machine or is located inside an access cap. A cleaning cloth or an all-purpose cleaner may be enough to clean the filter and keep it free of lint. However, it’s usually a good idea to have a professional do the work if you’re not a handyperson.

Clean the filter and seal a washer that won’t drain is a small task, but it is one that you should consider if your machine isn’t doing its job. To get started, you’ll need to shut off the water supply, unplug the power from the wall, and remove the hose.

When you’re ready to clean the filter and seal a washer that won’t flow, you’ll want to take your time and use the correct techniques. You can try cleaning the filter with a brush or by inserting it under a tap.

You’ll also need to make sure you’re not bending the drain hose. Bending the hose can cause the washer to not drain. The hose itself can be cleaned by soaking it in hot water.

When you’re done, reattach the hose and re-test the washer. After you’ve determined that you’ve fixed the problem, you should have the machine draining correctly. And, if the washer isn’t draining at all, it’s probably time to replace the filter.

Cleaning the filter and sealing a washer that won’t drain is one of the easiest ways to keep your washing machine running properly. In fact, you should do it regularly.

Check below to find out if your area is included in the list of cities that fall within our service area in Broward County Florida:

Weston, Tamarac, Plantation, Sunrise, Pompano Beach, Oakland Park, North Lauderdale, Pembroke Pines, Parkland, Margate, Miramar, Fort Lauderdale, Deerfield Beach, Lauderdale Lakes, Hollywood, Lighthouse Point, Lauderhill, Dania, Coral Springs, Hallandale, Davie, Cooper City, Coconut Creek

The post How To Fix Washer That Won’t Drain By Cleaning The Drain Pump Filter first appeared on Appliance Repair Fort Lauderdale.

from Appliance Experts https://www.appliancerepairfortlauderdalefl.net/how-to-fix-washer-that-wont-drain-by-cleaning-the-drain-pump-filter/
via The Appliance Experts

Wednesday, April 27, 2022

How To Choose Your Dishwasher’s Power Cord

The dishwashers we use in our homes today are heavy-duty major household appliances that can offer a decent service life before the need for replacing them arises. In most cases, homeowners will have dishwashers installed during the time of constructing their houses in order to have the appliance hard-wired to the electric circuitry of their home. However, the problem arises when the appliance breaks down and a replacement is needed. Another problem also arises if the dishwashing machine needs to be moved to a different location considering the connection to the home’s electrical circuitry. In those situations, a power cord may be needed for the dishwasher. Some knowledge of basic electrical circuits will be necessary before the homeowner goes ahead to order for the power cord of the dishwasher. But when doing this for the very first time, it will be advisable to seek some help from a professional dishwasher service technician.

Buy the Right Dishwasher Power Cord

Finding the right power cord to buy may sound easier than it really is. There are several considerations you will have to make before placing an order for the power cord. Some essential elements of your house’s electrical circuitry must first be understood. That will help you to get an idea of how the electricity in your home will affect both your dishwasher and the power cord.

Volts

Volts are the units used to measure the voltage that an electrical system utilizes for sending current into an appliance like your dishwasher that is connected through the power cord to the electrical power outlet. In the US, the two voltage systems that are commonly used include the 120v and 240v systems. Voltage is like the pressure that pushes electrons to flow in an electrical circuit, so it causes current, the flow of those electrons. Higher voltage supply means more current, but each appliance is designed and rated for more specific amounts of voltage and current, so you need to buy a power cord that can handle that to be suitable for your appliance.

Amps

Amps are the units for measuring how much current is flowing into your dishwasher circuit from the power outlet. You will need a power cord with a rating of the same amps or more as your dishwasher’s electronic circuit that it will be connected to. Major appliances typically run with circuits on 20, 50 or even 60 amps, while small appliances will require 15 or 20 amps. You have to ensure you match the amps that your dishwasher requires to that of the power cord you want to order.

Watts

A dishwasher or any other appliance requires a certain amount of power to function at nominal capacity, and that power is usually measured in terms of watts. You can quickly determine the amount of power (watts) needed to run your dishwasher by simply multiplying its rated voltage (volts) by its current (amps). For example, if the dishwasher uses the 120v circuit system with 10 amps, it will require 1,200 watts of power for efficient operation.

Breakers

Circuit breakers are devices used in electrical circuits for protection against shorting and overloading. Immediately a circuit breaker detects a sudden surge in voltage, it usually trips and cuts off the supply of power to the circuits. That is the mechanism through which the circuit breaker protects the home wiring, your dishwasher, other appliances and electronics from damage that may be caused by sudden voltage spikes. Electrical damage from sudden spikes can potentially cause overheating and fires, so circuit breakers are necessary to prevent that. When you attempt dishwasher repair without the help of professional appliance service technicians, the circuit breaker will also be important.

Correct Plug Type

Heavy duty home appliances like your dishwasher in most cases will use 15-amps three-prong power cord. That includes a center prong for the ground plug to prevent electric shock that may result from short-circuits or loose wires inside devices. It is important to ensure you buy a power cord with 3 prongs for your dishwasher or other major household appliances. The distance between your dishwasher and the wall is another important aspect to be considered. You may need for some units 90-degree plugs that align flat to the wall which makes it possible for the appliance to fit into its place.

Selecting the Right Wire Gauge

The gauge of a wire is another important factor to consider because it determines the amount of voltage and current that can be safely conveyed through the wire to the appliance. The American Wire Gauge (AWG) system is used for sizing the wires, with the wire gauge numbers increasing as the wire diameters decrease. Large appliances require low gauge (thicker) wires that can convey more volts and amps. Using high gauge wires may result in overheating and melting of the wires that can cause fires. You may need a 12-gauge wire for your dishwasher because that wire can manage up to 41 amps of current, instead of the higher 16-gauge wire that can only manage up to 22 amps. If it is not easy for you to determine the right wire gauge in your residential setting, it is advisable to get the help of a professional dishwasher repair technician.

We have highly trained and experienced appliance repair technicians that service all the major appliances in Broward County and nearby communities:

Tamarac, Hallandale, Deerfield Beach, Weston, Hollywood, Miramar, Coral Springs, Lauderhill, Davie, Fort Lauderdale, North Lauderdale, Sunrise, Oakland Park, Lauderdale Lakes, Parkland, Margate, Lighthouse Point, Pembroke Pines, Dania, Cooper City, Coconut Creek, Plantation, Pompano Beach, Orlando

The post How To Choose Your Dishwasher’s Power Cord first appeared on Appliance Repair Fort Lauderdale.

from Appliance Experts https://www.appliancerepairfortlauderdalefl.net/how-to-choose-your-dishwashers-power-cord/
via The Appliance Experts

Thursday, February 17, 2022

How To Repair Your Freezer If Running But Not Freezing

A freezer is one of the most useful household appliances especially because of the ever present need to preserve perishable food items as well as making our lives a bit easier during the hot summer months. The appliance helps you avoid all those unnecessary food shopping trips because you can just freeze your food and save both money and time. But like most other major home appliances the freezer at some point may also malfunction when you need it most. Fixing such an appliance on your own may not be an option for you. A freezer service technician is best suited to come and assist you solve such a problem. Freezer running but not freezing food may be one of the most common household appliance problems. Several factors may contribute to this kind of problem but you can always find a professional appliance service technician to fix it.

Let us look at some of the most common problems with freezers as well as the options to consider for repair as discussed below:

Dirty evaporator coils or condenser

If you can still hear that the compressor motor is running but the freezer is actually not cooling, then the problem may have to do with the evaporator or the condenser coils. Make sure to find a reliable refrigerator repairman who should inspect the condenser to figure out the problems.If the model of your freezer is one of those with the condenser coils being located somewhere behind the unit, then it would mean there has been too much exposure to dirt. If they get too dirty, the condenser coils will be incapable of dispersing heat as required and that is what affects the capacity of the freezer to cool.

The condenser coils should be cleaned at least within every 6 to 12 months. Other freezer models will have the condenser coils located within the freezer itself. That significantly helps reduce dirt exposure to the evaporator coils, so such models of freezers are much safer with less cleaning requirements.

Fault in the start relay

Refrigerator compressor
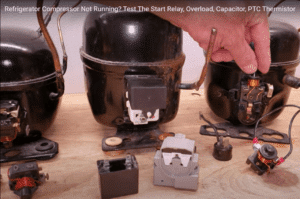
A problematic start relay is another common problem homeowners will have with freezers.This part of the freezer is responsible for providing power to the compressor. You can locate the compressor at the back of the unit, usually near the bottom.Failure in the start relay means that the compressor will also not run. With the compressor not working as it should, then obviously your freezer will also not be able to cool. If that happens, then you need to contact your residential freezer technician to come and repair it. For the repairman to be able to inspect the start relay , he will have to disconnect the freezer from the power outlet before removing the start relay from the compressor.The technician uses a multimeter for testing the start relay to check for continuity. If the test which is done between the start and run terminals confirms that there is no continuity, the part will require replacement. Sometimes the start relay is burnt and also requires replacement.

The process followed by the technician to identify this kind of problem and to fix it may not be compared to most DIY projects that people can comfortably do around their houses. The best thing to do is to make sure only a professional and a licensed refrigerator technician handles such kinds of situations and services the freezer regularly.

Evaporator fan motor is faulty

faulty evaporator fan motor
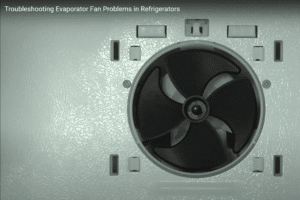
When the evaporator fan becomes defective, that will be another reason why the freezer will just keep running without freezing. The evaporator fan works by moving air over to the condenser coils and dissipating it throughout the unit. But when the evaporator fan motor fails to operate in that manner, the freezer will not cool. When that happens, it becomes necessary to get professional freezer repairs which can easily correct the problem of faulty evaporator fan motor. When checking the evaporator fan motor, the freezer repair technician usually opens the door of the unit and  manipulates the switch on the door. If that activation fails, then the evaporator fan motor will need to be replaced. It is important to note that the evaporator fan motor on most models of refrigerators usually doesn’t run with the door left open.

As a major household appliance, a freezer is worth fixing for the above discussed type of problems. All those are common problems with freezers that can be successfully fixed and have the freezer lasting long, as long as it continues to get proper care and maintenance.

Our highly experienced techs are servicing all major appliances for communities in Broward County and nearby:

Tamarac, Plantation, Pompano Beach, Cooper City, Weston, Hollywood, Sunrise, Miramar, Coral Springs, Lauderhill, Davie, Fort Lauderdale, North Lauderdale, Oakland Park, Margate, Lighthouse Point, Lauderdale Lakes, Parkland, Coconut Creek, Pembroke Pines, Hallandale, Deerfield Beach, Dania, Orlando

The post How To Repair Your Freezer If Running But Not Freezing first appeared on Appliance Repair Fort Lauderdale.

from Appliance Experts https://www.appliancerepairfortlauderdalefl.net/how-to-repair-your-freezer-if-running-but-not-freezing/
via The Appliance Experts

Friday, November 13, 2020

How To Repair Refrigerator Evaporator Fan Problems

The reason your refrigerator isn’t cooling may have to do with the evaporator fan-related problems. The fan is located somewhere inside the back wall of the refrigerator or freezer compartments behind one or more panels. It is typically mounted onto an evaporator fan assembly. This fan when properly working is supposed to blow air through evaporator fins to aid the absorption of heat which cools the air before it is blown into both the refrigerator and freezer compartments. When the fan stops running or no longer blows cool air, it normally needs to be checked and that could make it necessary for its replacement. It is therefore critical to understand all the troubleshooting options needed to fix problems with the evaporator fan. Continuity checks are needed to identify the problem and make sure the electronic control board, the evaporator fan motor, and the wiring that connects them are working correctly.

Troubleshooting and fixing the evaporator fan if a refrigerator stops cooling

The evaporator fan is normally supposed to start running as soon as the compressor on your refrigerator turns on. However, physical obstruction can potentially stop the evaporator fan from running freely. Ice build-up too on the blades of the evaporator fan can hinder its operation. Melting the ice in most cases will solve the problem unless the blades become damaged to a point of bending and jamming or damage has been caused to the motor windings of the fan.  When the blades become bent, they can only be replaced because straightening them in most cases will not restore their balance successfully. Sometimes dirt also builds up on the bearings of the evaporator fan and that can be solved with penetrating oil application.

When your refrigerator evaporator fan won’t turn on, there are certain things you will need to check to troubleshoot, identify, and fix the problem:

Make sure to check the electronic control board

The first thing you need to do is to enter into the diagnostic test mode so that you may be able to confirm if the evaporator fan starts running. To do so you will need to check the technical sheet often taped at the back of your fridge or just behind the front grill on the bottom side.  If the fan successfully runs during the test mode but not in normal operation, you will know it is the electronic control board that will need to be replaced.

Troubleshooting the wiring problems 

In case the evaporator fan doesn’t run during the diagnostic test mode, it could mean the problem is with the control board, the evaporator fan itself, or breaks within the wiring connections. You will need to unplug the refrigerator from the electrical power outlet for your safety and then will need to check for continuity through the wiring. To remove it, you will need to unscrew the control box and then find the wire which supplies power to the fan. The wire will need to be inspected for any physical damages and even if none is found a continuity check will still need to be carried out using a multimeter. The control board must be removed before dropping the back freezer panel in order to get the evaporator fan unplugged, which allows access to the wiring. Two wires will require checking for continuity and most likely that’s a red and a blue wire. The continuity check for each of those wires should register zero ohms on your multimeter. If you don’t get continuity with any of the wires, there’s probably a break that needs to be found. The wire harness will need to be unplugged from the ceiling so that continuity can be checked between the control board’s plug for the bad wire and the ceiling plug. In this case, if continuity is not detected the multimeter should be reading infinite resistance, which displays 1. The broken wire will need to be repaired or the wire harness replaced. Should there be no problem with continuity, it could be that the problem lies with the electronic control board or the evaporator fan motor.

How to examine the evaporator fan motor and electronic control board

The fan motor of your refrigerator may have a control board inside its casing. That makes it almost impossible to check for any continuity other than looking out for visible burns on the control board. If any burn marks are visible, the fan motor will need to be replaced. If no burns, it is best to get help from a professional appliance repair technician because he is qualified to do further tests that determine if the control board sends power to the fan motor.

These are some of the cities we are servicing in Broward County and nearby:

Tamarac, Pompano Beach, Plantation, Weston, Sunrise, Hollywood, Miramar, Coconut Creek, Coral Springs, Davie, Lauderhill, Fort Lauderdale, Parkland, North Lauderdale, Pembroke Pines, Oakland Park, Margate, Lighthouse Point, Lauderdale Lakes, Hallandale, Deerfield Beach, Dania, Cooper City, Orlando

The post How To Repair Refrigerator Evaporator Fan Problems first appeared on Appliance Repair Fort Lauderdale.


from Appliance Experts https://www.appliancerepairfortlauderdalefl.net/how-to-repair-refrigerator-evaporator-fan-problems/
via The Appliance Experts